GlusterFS, MySQL, Postfix-admin, HAProxy を使用したメールサーバクラスタ構築
■やりたいこと/やること
今回の目的は以下のとおり。
- 夜中・休日に起こされないメールサーバを作りたい。(涙拭けよ)
- 管理が楽なメールサーバを作りたい。(ブラウザからポチポチ管理したい、各ユーザに自分でPW変更とかさせたい)
|
(1)Serverを3台準備する。
- マスター用 10.24.96.120
- スレーブ用 10.24.96.121
- LB用 10.24.96.122
(2)GlusterFS setup
//リポジトリ取得、インストール、自動起動ON
yum install centos-release-gluster
yum install glusterfs-server
chkconfig glusterd on

//マウント用ディレクトリ、Gluster用ディレクトリ作成
mkdir /mail
chmod 777 /mail

//Gluster用の追加ディスクのパーティション作成、ファイルシステム構築、マウント設定
fdisk /dev/sdb
mkfs.ext4 /dev/sdb1
mount -t ext4 /dev/sdb1 /gluster/
mkdir /gluster/gs01
echo "/dev/sdb1 /gluster ext4 defaults        1 1" >> /etc/fstab

//Glusterd起動、ピア登録、DFSを作成、
etc/init.d/glusterd start
echo "10.24.96.120 gmail01.com" >> /etc/hosts
echo "10.24.96.121 gmail02.com" >> /etc/hosts
gluster peer probe 10.24.96.121
gluster volume create gs01 replica 2 gmail01.com:/gluster/gs01 gmail02.com:/gluster/gs01
mount -t glusterfs gmail01.com:/gs01 /mail

//Fail_Over & マウント設定
echo "gmail01.com:/gs01 /mail glusterfs defaults,_netdev,backupvolfile-server=gmail02.com 0 0" >> /etc/fstab

//Errorがないことを一応確認
mount -a
■Slaveサーバ側
//リポジトリ取得、インストール、自動起動ON
yum install centos-release-gluster
yum install glusterfs-server
chkconfig glusterd on

//マウント用ディレクトリ、Gluster用ディレクトリ作成
mkdir /mail
chmod 777 /mail

//Gluster用の追加ディスクのパーティション作成、ファイルシステム構築、マウント設定
fdisk /dev/sdb
mkfs.ext4 /dev/sdb1
mount -t ext4 /dev/sdb1 /gluster/
mkdir /gluster/gs01
echo "/dev/sdb1 /gluster ext4 defaults        1 1" >> /etc/fstab

//Glusterd起動、ピア登録、DFSを作成、
etc/init.d/glusterd start
echo "10.24.96.120 gmail01.com" >> /etc/hosts
echo "10.24.96.121 gmail02.com" >> /etc/hosts
mount -t glusterfs gmail02.com:/gs01 /mail

//Fail_Over & マウント設定
echo "gmail02.com:/gs01 /mail glusterfs defaults,_netdev,backupvolfile-server=gmail01.com 0 0" >> /etc/fstab

//Errorがないことを一応確認
mount -a
(3)必要なソフトウェアをインストール&ダウンロード
//SMTPサーバ構築に必要
yum install postfix

//POP,IMAPサーバ構築に必要
yum install dovecot-mysql dovecot

//自動起動ON
chkconfig mysqld on
chkconfig httpd on
chkconfig dovecot on
<マスターサーバ側のみ>
//Postfix-adminに必要()
yum install -y http php mysql mysql-server mysql-devel php-mysql php-mbstring php-imap mod_auth_mysql
cd /var/www/html/
wget http://nchc.dl.sourceforge.net/sourceforge/postfixadmin/postfixadmin-2.92.tar.gz
tar zxvf postfixadmin-2.92.tar.gz
mv postfixadmin-2.92 postfixadmin
(4)MySQLの初期設定・REPLICATION設定
//MySQL起動、MySQL rootパスワード設定
/etc/init.d/mysqld start
/usr/bin/mysqladmin -u root password ‘PASSWORD'
mysql -u root -p
//MySQLでメール情報を格納するDB,Tableを作成
mysql> create database postfix;
mysql> create user postfix@localhost identified by ‘YourPassword';
mysql> grant all privileges on postfix.* to postfix@localhost;

//レプリケーション用ユーザ作成
mysql> GRANT REPLICATION SLAVE ON *.* TO repl@'10.24.96.0/255.255.255.0' IDENTIFIED BY ‘YourPassword';
mysql> quit

//起動
/etc/init.d/mysqld start
■MySQLレプリケーション設定
//MySQL rootパスワード設定
cp -a /etc/my.cnf /etc/my.cnf.default
vi /etc/my.cnf
//[mysqld]セクションに追記
#replication
server-id = 1001
log-bin = mysql-bin
relay-log = relay-log

//再起動
/etc/init.d/mysqld restart
<スレーブ側で設定>
//MySQL起動、MySQL rootパスワード設定
cp -a /etc/my.cnf /etc/my.cnf.default
vi /etc/my.cnf

//[mysqld]セクションに追記
#replication
server-id = 1002
■DBの停止・DBコピー・ポジション番号の取得
<マスターサーバ側で実行する。>
mysql> FLUSH TABLES WITH READ LOCK;

//試しにデータベースに更新系クエリを発行してみる。怒られる。
mysql> create database test;
ERROR 1223 (HY000): Can't execute the query because you have a conflicting read lock
停止したMySQLデータベースを丸ごとコピーし、レプリケーション開始に必要なポジション番号を取得します。作業後はスレーブサーバに必要な情報が揃いましたので、マスターで書き込みを許可します。
//DBディレクトリに移動、圧縮アーカイブ化、現在ポジション番号を取得
cd /var/lib/mysql
tar cpfv /var/tmp/dbm-20161006.tar .
echo "SHOW MASTER STATUS\G" | mysql -u root -p >> /var/tmp/dbm-position20161006.txt
//書き込み再開
mysql> UNLOCK TABLES;
mysql> quit
Bye
マスターサーバからDBデータとポジション番号を確認します。(下記例では5097)
cat /var/tmp/dbm-position20161006.txt

*************************** 1. row ***************************
            File: mysql-bin.000001
        Position: 5097
    Binlog_Do_DB:
Binlog_Ignore_DB:
[root@gmail01 ~]# scp -rp /var/tmp/dbm-20161006.tar root@10.24.96.121:/var/tmp/
<スレーブ側で実行>
tar -xpf /var/tmp/dbm-snapshot-20161006.tar -C /var/lib/mysql/
[root@gmail02 mysql]# ls -l /var/lib/mysql/
合計 20504
-rw-rw---- 1 mysql mysql 5242880 10月 8 16:25 2016 ib_logfile0
-rw-rw---- 1 mysql mysql 5242880 10月 7 21:56 2016 ib_logfile1
-rw-rw---- 1 mysql mysql 10485760 10月 8 16:24 2016 ibdata1
drwx------ 2 mysql mysql 4096 10月 7 21:56 2016 mysql
-rw-rw---- 1 mysql mysql 5097 10月 8 17:01 2016 mysql-bin.000001
-rw-rw---- 1 mysql mysql 19 10月 8 16:25 2016 mysql-bin.index
drwx------ 2 mysql mysql 4096 10月 8 16:20 2016 postfix
drwx------ 2 mysql mysql 4096 10月 7 21:56 2016 test
スレーブサーバからレプリケーションを開始します。
<スレーブ側で実行>
mysql> CHANGE MASTER TO MASTER_HOST='10.24.96.120',
MASTER_USER='repl',
MASTER_PASSWORD=‘YourPasswordr',
MASTER_LOG_FILE='mysql-bin.000001',
MASTER_LOG_POS=5097
;

mysql> start slave;
Query OK, 0 rows affected (0.00 sec)
レプリケーションが開始されたことを確認します。I/OスレッドとSQLスレッドがともにYesとなっているかを確認します。
- Slave_IO_Running: Yes
- Slave_SQL_Running: Yes
mysql> SHOW SLAVE STATUS\G
*************************** 1. row ***************************
               Slave_IO_State: Waiting for master to send event
                  Master_Host: 10.24.96.120
                  Master_User: repl
                  Master_Port: 3306
                Connect_Retry: 60
              Master_Log_File: mysql-bin.000001
          Read_Master_Log_Pos: 6756
               Relay_Log_File: relay-log.000002
                Relay_Log_Pos: 1910
        Relay_Master_Log_File: mysql-bin.000001
              Replicate_Do_DB:
          Replicate_Ignore_DB:
           Replicate_Do_Table:
       Replicate_Ignore_Table:
      Replicate_Wild_Do_Table:
  Replicate_Wild_Ignore_Table:
                   Last_Errno: 0
                   Last_Error:
                 Skip_Counter: 0
          Exec_Master_Log_Pos: 6756
              Relay_Log_Space: 2059
              Until_Condition: None
               Until_Log_File:
                Until_Log_Pos: 0
           Master_SSL_Allowed: No
           Master_SSL_CA_File:
           Master_SSL_CA_Path:
              Master_SSL_Cert:
            Master_SSL_Cipher:
               Master_SSL_Key:
        Seconds_Behind_Master: 0
Master_SSL_Verify_Server_Cert: No
                Last_IO_Errno: 0
                Last_IO_Error:
               Last_SQL_Errno: 0
               Last_SQL_Error:
(5)Postfixの設定(Masterのみ)
cd /root/
openssl genrsa 2048 > mail2016.key
openssl req -new -key mail2016.key > mail2016.csr
openssl x509 -days 365 -req -signkey mail2016.key < mail2016.csr > mail2016.crt
cp -a mail2016.key /etc/pki/tls/private/
cp -a mail2016.crt /etc/pki/tls/certs/
■Postfixコンフィグファイル編集
vi /etc/postfix/main.cf
各パラメータの内容は下記のとおりです。
|
inet_interfaces = all
|
リッスンするIPアドレスを指定する。デフォルトでlocalhostのみなので、allへ変更する。
|
|
mydestination =
|
受け取ったメールが自分宛てのドメインかそうではないかを判断するパラメータ。今回はこのパラメータではなくMySQLのルックアップテーブルを使用するので空にしておく。
|
|
mynetworks = 10.0.0.0/8, 127.0.0.0/8
|
外部ドメインへメールのリレーを許可する。
|
|
#home_mailbox
|
このパラメータはホームディレクトリから相対パスでユーザのメールボックスを指定するためのパラメータです。今回は、メールボックスの場所の指定は、mail_spool_directoryで行うのでコメントアウトします。この設定が有効になると、mail_spool_directoryが無効化されます。
|
|
mail_spool_directory = /mail/~/
|
ユーザのメールボックスを指定します。末尾にスラッシュがつけばMailDir形式スラッシュがなければMbox形式になります。
|
#Virtual Mailbox config
virtual_mailbox_maps = mysql:/etc/postfix/mysql_virtual_mailbox_maps.cf
virtual_alias_maps = mysql:/etc/postfix/mysql_virtual_alias_maps.cf
virtual_mailbox_domains = mysql:/etc/postfix/mysql_virtual_domains_maps.cf
virtual_mailbox_limit = 0
virtual_mailbox_base = /mail
virtual_minimum_uid = 5000
virtual_uid_maps = static:5000
virtual_gid_maps = static:5000

#SMTP-Auth config
smtpd_sasl_auth_enable = yes
smtpd_sasl_type = dovecot
smtpd_sasl_path = private/auth
smtpd_sasl_local_domain = $myhostname
smtpd_client_restrictions = reject_rbl_client bl.spamcop.net
smtpd_recipient_restrictions = permit_mynetworks, permit_sasl_authenticated, reject_unauth_destination
smtpd_sasl_security_options = noanonymous
broken_sasl_auth_clients = yes

#TLS/SSL config
smtpd_tls_security_level = may
smtpd_tls_loglevel = 1
smtpd_tls_cert_file = /etc/pki/tls/certs/mail2016.crt
smtpd_tls_key_file = /etc/pki/tls/private/mail2016.key
smtpd_tls_auth_only = no
|
virtual domain関連 パラメータ
|
意味
|
|
virtual_mailbox_maps = proxy:mysql:/etc/postfix/mysql_virtual_mailbox_maps.cf
|
Postfixが配送時に参照するmailbox情報を指定するパラメータ。
DBサーバへの接続情報や発行するSQLクエリに必要な情報を記載した
ルックアップテーブルファイルを指定する。
|
|
virtual_alias_maps = proxy:mysql:/etc/postfix/mysql_virtual_alias_maps.cf
|
Postfixが配送時に参照するエイリアス情報を指定するパラメータ。
DBサーバへの接続情報や発行するSQLクエリに必要な情報を記載した
ルックアップテーブルファイルを指定する。
|
|
virtual_mailbox_domains = proxy:mysql:/etc/postfix/mysql_virtual_domains_maps.cf
|
Postfixが配送時に参照するdomain情報を指定するパラメータ。
DBサーバへの接続情報や発行するSQLクエリに必要な情報を記載した
ルックアップテーブルファイルを指定する。
|
|
virtual_mailbox_limit = 0
|
virtualメールボックスのサイズ上限。(デフォルト50MB??)0にすることで無制限にすることが可能。
|
|
virtual_mailbox_base = /mail
|
virtualユーザのメールボックスの配送先。
今回はGlusterFS領域の/mailを指定する。
|
|
virtual_minimum_uid = 5000
|
virtual配送されるユーザの最小UIDを指定する。
|
|
virtual_uid_maps = static:5000
|
Postfixはメールを配送する場合に配送エージェントプロセス(virtual)が配送先のユーザ権限で新たなメールファイルを作成するが、バーチャルユーザにはuid,gidがないため、virtul用のuidを固定で指定する。存在しないuidでもOK。
|
|
virtual_gid_maps = static:5000
|
Postfixはメールを配送する場合に配送エージェントプロセス(virtual)が配送先のユーザ権限で新たなメールファイルを作成するが、バーチャルユーザにはuid,gidがないため、virtul用のuidを固定で指定する。存在しないgidでもOK。
|
|
SMTP-auth関連 パラメータ
|
意味など |
|
smtpd_sasl_auth_enable = yes
|
SMTP-Authを有効にする
|
|
smtpd_sasl_type = dovecot
|
dovecot側のsmtp-auth機能を利用する。SMTP-authを利用する場合、SASL認証ライブラリを使う必要がある。
ライブラリはCyrus-SASLとDovecot-SASLライブラリがある。Cyrusパッケージのsasl-authdデーモンを使用してCyrus-SASL認証ライブラリを使用することもできるが、別途,認証にMySQLデータベースを読ますための設定等が必要になるため、今回はdovecot-SASLを使用し、Cyrus-SASLは使用しない。
|
|
smtpd_sasl_path = private/auth
|
SASL認証で利用するソケットファイルを指定する。Dovecotと共用する。
/var/spool/postfix/からの相対パスで記載。
|
|
smtpd_sasl_local_domain = $myhostname
#smtpd_sasl_local_domain = $myhostname??
|
Cyrus-SASLを利用する場合に必要。
今回は不要?
|
|
#smtpd_client_restrictions = reject_rbl_client bl.spamcop.net
|
Blacklistを使用して他のメールサーバやクライアントからのメール送信
を制限する場合に使用するパラメータ。
今回は不要?
|
|
smtpd_recipient_restrictions = permit_mynetworks, permit_sasl_authenticated, reject_unauth_destination
|
メール受付時に、リレーを制限できるパラメータ。
permit_mynetworksはmynetworksパラメータからリレーを受け付ける。
permit_sasl_authenticated SMTP認証を通過したクライアントからのリレーを許可する。
reject_unauth_destination はSMTP-AUTHを行わないホストからのリレーを拒否するオプション。
|
|
smtpd_sasl_security_options = noanonymous
|
匿名でのSMTP-authを拒否する。
noplaintextを指定すると平文パスワードの使用を拒否する。
|
|
broken_sasl_auth_clients = yes
|
古いバージョンのAUTHコマンドを使用したクライアントからの
認証を許可するか?デフォルトはno
|
|
SSL/TLS関連 パラメータ
|
意味など |
|
smtpd_tls_security_level = may
|
mayを指定することで、PostfixはSMTPの通信開始時、暗号化(STARTLS開始)を要求し可能なら暗号化する。encryptを指定すると強制します。master.cfでencryptedを有効化すると25ポートへも暗号化を強制するため外部サーバからのメール配送時に相手が暗号化できない場合、配送に失敗することになるので、絶対に指定しないこと。
|
|
smtpd_tls_loglevel = 1
|
SSL/TLS通信時のログ記録の度合いを指定する。
0 TLS動作に関するログ記録を無効にします。
1 TLSハンドシェイクと証明書の情報をログに記録します。
2 TLSネゴシエーションの間のレベルをログに記録します。
3 TLSネゴシエーションプロセスの16進数およびASCIIダンプを ログに記録します。
4 STARTTLS以降の通信の16進数およびASCIIダンプを完全に ログに記録します。
|
|
smtpd_tls_cert_file = /etc/pki/tls/certs/mail2016.crt
smtpd_tls_key_file = /etc/pki/tls/private/mail2016.key
|
SSLの証明書、秘密鍵の置き場を指定します。
|
|
smtpd_tls_auth_only = no
|
認証時にTLSを強制するかしないかの指定を行います。
|
---
---
postfix check
[root@gmail01 ~]# /etc/init.d/postfix restart
postfix を停止中: [ OK ]
postfix を起動中: [ OK ]
(6)Dovecotの設定(Masterのみ)
//コンフィグファイル作成
touch /etc/postfix/mysql_virtual_mailbox_maps.cf
touch /etc/postfix/mysql_virtual_alias_maps.cf
touch /etc/postfix/mysql_virtual_domains_maps.cf
//DB接続情報、SELECTクエリ発行の設定を書き込む
[root@postfix-master ~]# cat /etc/postfix/mysql_virtual_mailbox_maps.cf
user = postfix
password = YourPassword
hosts = localhost
dbname = postfix
table = mailbox
select_field = maildir
where_field = username

[root@postfix-master ~]# cat /etc/postfix/mysql_virtual_alias_maps.cf
user = postfix
password = YourPassword
hosts = localhost
dbname = postfix
table = alias
select_field = goto
where_field = address

[root@postfix-master ~]# cat /etc/postfix/mysql_virtual_domains_maps.cf
user = postfix
password = YourPassword
hosts = localhost
dbname = postfix
table = domain
select_field = domain
where_field = domain

[root@postfix-master ~]# dovecot -n
# 2.0.9: /etc/dovecot/dovecot.conf
# OS: Linux 2.6.32-504.el6.x86_64 x86_64 CentOS release 6.6 (Final)
auth_debug = yes
auth_debug_passwords = yes
auth_mechanisms = plain LOGIN CRAM-MD5
first_valid_gid = 5000
first_valid_uid = 5000
mail_location = maildir:~/
mbox_write_locks = fcntl
passdb {
  args = /etc/dovecot/dovecot-sql.conf.ext
  driver = sql
}
service auth {
  unix_listener /var/spool/postfix/private/auth {
    group = postfix
    mode = 0660
    user = postfix
  }
}
ssl_cert = </etc/pki/tls/certs/jimae.crt
ssl_key = </etc/pki/tls/private/jimae.key
userdb {
  args = /etc/dovecot/dovecot-sql.conf.ext
  driver = sql
}
//config Backup
cp -a /etc/dovecot/conf.d/10-master.conf /etc/dovecot/conf.d/10-master.conf.defaut
vi /etc/dovecot/conf.d/10-mail.conf
//Postfixのバーチャル設定と合わせる。
diff /etc/dovecot/conf.d/10-mail.conf /etc/dovecot.default/conf.d/10-mail.conf
30c30
< mail_location = maildir:~/
---
> #mail_location =
167c167
< first_valid_uid = 5000
---
> #first_valid_uid = 500
174c174
< first_valid_gid = 5000
---
> #first_valid_gid = 1
■ユーザ認証にDBを参照させる,
//ConfigをBackupします。
cp -a /etc/dovecot/conf.d/10-master.conf /etc/dovecot/conf.d/10-master.conf.default
vi /etc/dovecot/conf.d/10-master.conf
//
[root@gmail01 ~]# diff /etc/dovecot/conf.d/10-master.conf /etc/dovecot/conf.d/10-master.conf.defaut
81c81
< #unix_listener auth-userdb {
---
> unix_listener auth-userdb {
85c85
< #}
---
> }
88,92c88,90
< unix_listener /var/spool/postfix/private/auth {
< mode = 0660
< user = postfix
< group = postfix
< }
---
> #unix_listener /var/spool/postfix/private/auth {
> # mode = 0666
> #}
114,117d111
<
< auth_debug_passwords = yes
< auth_verbose = no
< auth_debug = yes
■認証時に発行するSQLクエリを定義します。
[root@gmail01 ~]# cat /etc/dovecot/dovecot-sql.conf.ext
driver = mysql
default_pass_scheme = MD5-CRYPT
connect = dbname=postfix user=postfix host=/var/lib/mysql/mysql.sock password=YourPassword
password_query = SELECT password FROM mailbox WHERE username = '%u' AND active = '1'
user_query = SELECT concat('/mail/', maildir) as home, 5000 AS uid, 5000 AS gid FROM mailbox WHERE username = '%u' AND active = '1'
参考までに発行されるクエリを実際にMySQLで叩いてみました。メール配送時にどのようなレコードを取得しているかよくわかりますね。
mysql> SELECT concat('/mail/', maildir) as home, 5000 AS uid, 5000 AS gid FROM mailbox WHERE username = 'testuser@test01.com';+----------------------------+------+------+
| home | uid | gid |
+----------------------------+------+------+
| /mail/test01.com/testuser/ | 5000 | 5000 |
+----------------------------+------+------+
1 row in set (0.00 sec)mysql> SELECT password FROM mailbox WHERE username = 'testuser@test01.com';
+------------------------------------+
| password |
+------------------------------------+
| $1$4dc08f18$LwbAjclR/irDpJA/2SVlk. |
+------------------------------------+
1 row in set (0.00 sec)
//config Backup
cp -a /etc/dovecot/conf.d/10-ssl.conf /etc/dovecot/conf.d/10-ssl.conf.default
vi /etc/dovecot/conf.d/10-ssl.conf

//下記SSL設定パラメータを書き換える。
[root@postfix-master ~]# diff /etc/dovecot/conf.d/10-ssl.conf /etc/dovecot/conf.d/10-ssl.conf.default
ssl_cert = </etc/pki/dovecot/certs/mail2016.crt
ssl_key = </etc/pki/dovecot/private/mail2016.key
■プロセス再起動
/etc/init.d/postfix restart
/etc/init.d/dovecot restart
/etc/init.d/dovecot start
(7)Apacheの設定
cp -a /etc/httpd/conf/httpd.conf /etc/httpd/conf/httpd.conf.default
vi /etc/httpd/conf/httpd.conf

//設置対象ディレクトリのディレクティブ内を変更、追加する。
<Directory "/var/www/html">
Options Indexes FollowSymLinks ExecCGI
order deny,allow
deny from all
allow from 10.24.96.0/24

//起動する。
/etc/init.d/httpd start
(8)Postfix-Adminの初期設定
//Config Backup , テンプレートへアクセス権限付与、
cp -a /var/www/html/postfixadmin/config.inc.php /var/www/html/postfixadmin/config.inc.php.default
chmod 777 /var/www/html/postfixadmin/templates_c/

//下記のように設定を書き換える。
[root@postfix-master ~]# diff /var/www/html/postfixadmin/config.inc.php /var/www/html/postfixadmin/config.inc.php.default

< $CONF['configured'] = true;
---
> $CONF['configured'] = false;
34c34
< $CONF['default_language'] = 'ja';
---
> $CONF['default_language'] = 'en';
86c86
< $CONF['database_password'] = 'YourPassword';
---
> $CONF['database_password'] = 'postfixadmin';
117c117
< $CONF['admin_email'] = 'taguchi@tagutagu.com';
---
> $CONF['admin_email'] = '';
148c148
< $CONF['dovecotpw'] = "/usr/bin/doveadm pw";
---
> $CONF['dovecotpw'] = "/usr/sbin/doveadm pw";
279,280c279,280
< $CONF['mailboxes'] = ‘0';
< $CONF['maxquota'] = ‘0';
---
> $CONF['mailboxes'] = '10';
> $CONF['maxquota'] = '10';
285c285
< $CONF['quota'] = 'yes';
---
> $CONF['quota'] = 'NO';
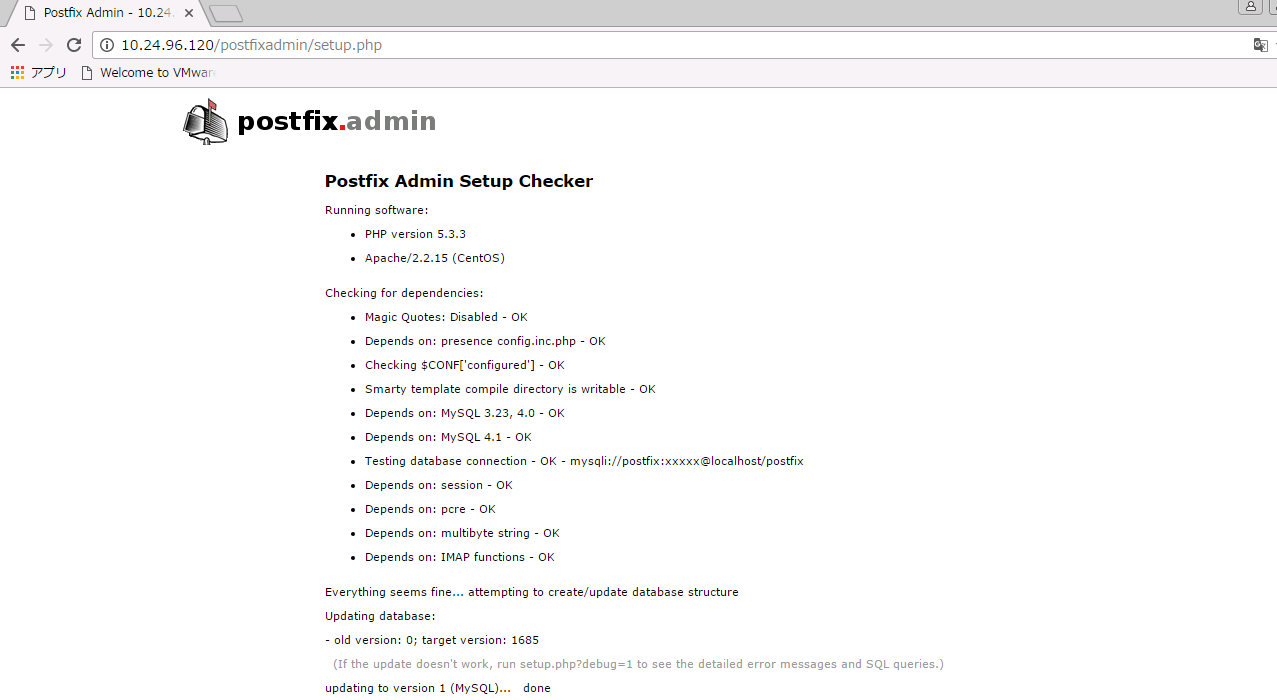
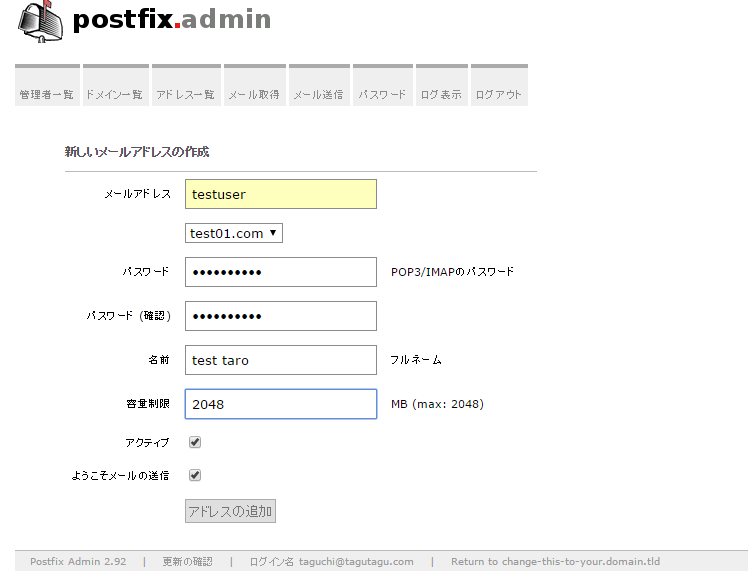
ブラウザでsetup画面へアクセス。(http://10.24.96.120/postfixadmin/setup.php)


| [root@gmail01 ~]# cat /var/www/html/postfixadmin/css/default.css @import url(calendar.css); body { background: #ffffff; color: #000000; font-family:'Lucida Grande','Hiragino Kaku Gothic ProN', 'ヒラギノ角ゴ ProN W3', Meiryo, メイリオ, sans-serif; font-size: 13px; font-weight: normal; text-align: left; }#container { width:970px; margin:auto; } a { text-decoration: none; color: #888888; }a:hover { text-decoration: underline; color: #888888; } a:visited, a:active { table { input, .button, textarea { input, .button, textarea, select { .readonly { .button { .button:hover, .button:focus { .flat { ul.flash-info { ul.flash-error { .error_msg { #motd { .standout { #login_header, #login, #main_menu, #overview, #login_header { #login { #login_table { #login_table h4 { #menu, #tabbar { #menu ul, #tabbar ul { } #menu li, #tabbar li { #menu li:hover, #menu li.sfhover, #tabbar li:hover, #tabbar li.sfhover { #menu li ul, #tabbar li ul { #menu li:hover ul, #menu li.sfhover ul, #tabbar li:hover ul, #tabbar li.sfhover ul { #menu li ul li, #tabbar li ul li { #menu a, #tabbar a { #menu a, #tabbar a, #menu a:hover, #tabbar a:hover { #menu li ul li a, #tabbar li ul li a { .subnav p { #edit_form table { #edit_form th { .hlp_center { .help_text { #main_menu table { #main_menu table td { #main_menu a { #main_menu a:hover { #overview h4, #overview P, #overview FORM, #admin_virtual h4, #admin_virtual P, #admin_virtual FORM { #alias_domain_table .header, #alias_table .header, #mailbox_table .header, #overview_table .header, #log_table .header, #admin_table .header { #alias_domain_table h3, #alias_table h3, #mailbox_table h3, #overview_table h3, #log_table h3, #admin_table h3 { #alias_domain_table .hilightoff, #alias_table .hilightoff, #mailbox_table .hilightoff, #overview_table .hilightoff, #log_table .hilightoff, #admin_table .hilighoff { #alias_domain_table .hilighton, #alias_table .hilighton, #mailbox_table .hilighton, #overview_table .hilighton, #log_table .hilighton, #admin_table .hilighton { #alias_domain_table tr:hover, #alias_table tr:hover, #mailbox_table tr:hover, #overview_table tr:hover, #log_table tr:hover, #admin_table tr:hover { th { td { td.label { label { #alias_domain_table td, #alias_table td, #mailbox_table td, #overview_table td, #log_table td, #admin_table td { #footer { #footer a { #footer a:hover { div.setup { div.setup li { .searchresult { span.active { div.nav_bar { cursor: default; |
(9)マスターサーバの動作テスト
echo "test" | mail -s "test" hogehoge@tagutagu02.com
root@gmail01 ~]# ll /mail/test01.com/testuser/new/
合計 1
-rw------- 1 5000 5000 502 10月  7 22:56 2016 1475848566.V13Ia2d483dd21bbe46cM843374.gmail01.com
(10)スレーブサーバの設定
//マスター側からPostfixとDovecotのファイルを持ってくる。
scp -rp 10.24.96.120:/etc/postfix /root/
scp -rp 10.24.96.120:/etc/dovecot /root/
mv /etc/postfix /etc/postfix.default
mv /etc/dovecot /etc/dovecot.default
cp -a /root/dovecot/ /etc/
cp -a /root/postfix /etc/
//証明書ファイルのコピー
scp 10.24.96.121:/etc/pki/tls/certs/mail2016.crt /etc/pki/tls/certs/mail2016.crt
scp 10.24.96.121:/etc/pki/tls/private/mail2016.key /etc/pki/tls/private/mail2016.key
(11)HAproxyのインストール・設定
yum install haproxy
chkconfig haproxy stop
■設定ファイルを編集します。
vi /etc/haproxy/haproxy.cfg

//defaultセクションのmodeをhttpからTCPに書き換える
defaults
 mode tcp

//追記する。
frontend 587_smtp
 bind 0.0.0.0:587
 default_backend 587_backend_postfix

backend 587_backend_postfix
 balance roundrobin
 mode tcp
 server gmail01.com 10.24.96.120:587 check
 server gmail02.com 10.24.96.121:587 check

frontend 25_smtp
 bind 0.0.0.0:25
 default_backend 25_backend_postfix

backend 25_backend_postfix
 balance roundrobin
 mode tcp
 server gmail01.com 10.24.96.120:25 check
 server gmail02.com 10.24.96.121:25 check


frontend 110_smtp
 bind 0.0.0.0:110
 default_backend 110_backend_postfix

backend 110_backend_postfix
 balance roundrobin
 mode tcp
 server gmail01.com 10.24.96.120:110 check
 server gmail02.com 10.24.96.121:110 check

frontend 143_smtp
 bind 0.0.0.0:143
 default_backend 143_backend_postfix

backend 143_backend_postfix
 balance roundrobin
 mode tcp
 server gmail01.com 10.24.96.120:143 check
 server gmail02.com 10.24.96.121:143 check

frontend 993_smtp
 bind 0.0.0.0:993
 default_backend 993_backend_postfix

backend 993_backend_postfix
 balance roundrobin
 mode tcp
 server gmail01.com 10.24.96.120:993 check
 server gmail02.com 10.24.96.121:993 check

frontend 995_smtp
 bind 0.0.0.0:995
 default_backend 995_backend_postfix

backend 995_backend_postfix
 balance roundrobin
 mode tcp
 server gmail01.com 10.24.96.120:995 check
 server gmail02.com 10.24.96.121:995 check

//起動・リッスン確認
/etc/init.d/haproxy restart

[root@haproxy01 ~]# netstat -tlnp
Active Internet connections (only servers)
Proto Recv-Q Send-Q Local Address Foreign Address State PID/Program name
tcp 0 0 0.0.0.0:22 0.0.0.0:* LISTEN 1244/sshd
tcp 0 0 0.0.0.0:25 0.0.0.0:* LISTEN 1638/haproxy
tcp 0 0 0.0.0.0:993 0.0.0.0:* LISTEN 1638/haproxy
tcp 0 0 0.0.0.0:995 0.0.0.0:* LISTEN 1638/haproxy
tcp 0 0 0.0.0.0:5000 0.0.0.0:* LISTEN 1638/haproxy
tcp 0 0 0.0.0.0:587 0.0.0.0:* LISTEN 1638/haproxy
tcp 0 0 0.0.0.0:110 0.0.0.0:* LISTEN 1638/haproxy
tcp 0 0 0.0.0.0:9102 0.0.0.0:* LISTEN 1254/bacula-fd
tcp 0 0 0.0.0.0:143 0.0.0.0:* LISTEN 1638/haproxy
tcp 0 0 :::22 :::* LISTEN 1244/sshd
